Onigiris holds a special place in my heart because it takes me right back to the streets of Japan! I remember waking up every morning and looking forward to grabbing breakfast at 7-Eleven or Lawson’s. I’d always get a variety of onigiri and sandwiches like Tamago Sando (Japanese egg sandwiches), and it’d be the best way to start my day.
One of my favorite onigiri in Japan was shiozake onigiri or salted salmon onigiri. Luckily, it’s one of the simplest, quickest, and most delicious ways to make an onigiri at home! Since you’ll only need a few ingredients, it’s important to use the highest quality and freshest ingredients to make the best-tasting onigiri.
Salmon is just one of many fillings you can use to make onigiris. Some other popular fillings include tuna and mayo, mushrooms, bonito flakes, spicy cod roe, and more! If you’re not the biggest fan of salmon, these variations are great alternatives! 🙂
Instead of shaping the onigiri by hand, I decided to purchase an onigiri mold from Amazon to shave off some time. It’s a serious game changer because my onigiri always comes out perfect every time! If you don’t want to use a mold, you can also shape it by hand. There are tons of resourceful videos on YouTube that can show you how it’s done.
Why you’ll love this recipe
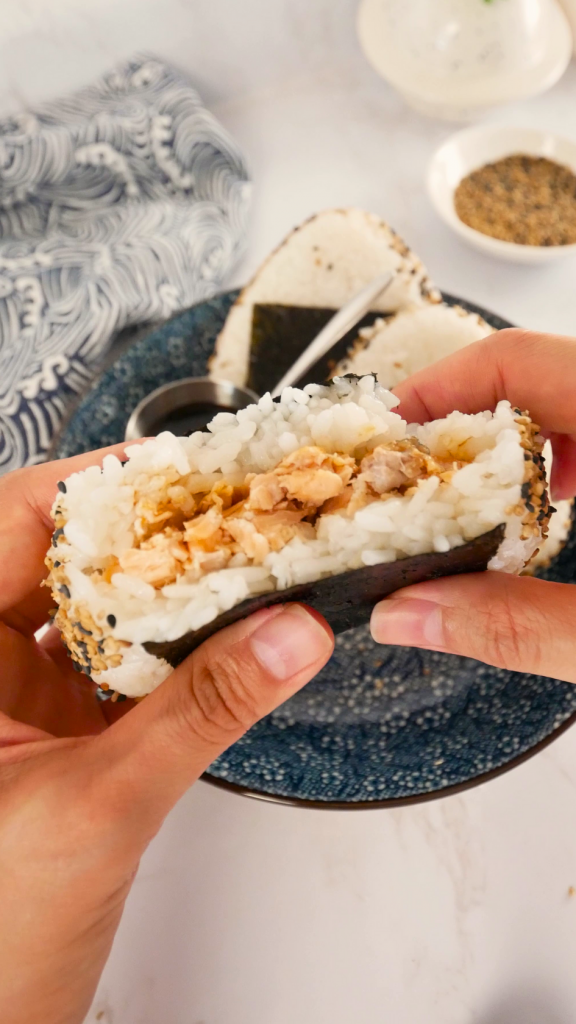
Shiozake is one of the easiest, most comforting meals and when stuffed in an onigiri, it makes something great even better. Every bite is the perfect ratio of salted salmon to rice and I promise, you’ll be grabbing seconds and thirds once you have a taste.
The best part of this recipe is the ease and simplicity of the ingredients and preparation. You don’t need any special marinades to season the salmon – all you’ll need is a sprinkle of salt to allow the natural flavors of the salmon to shine.
This salted salmon onigiri only takes 15 minutes to prepare so you can whip this up whenever you’re craving a hassle-free meal. The great thing about onigiri is that you can eat it on the go, so you can even prepare it the night before for a quick and tasty meal the next day!
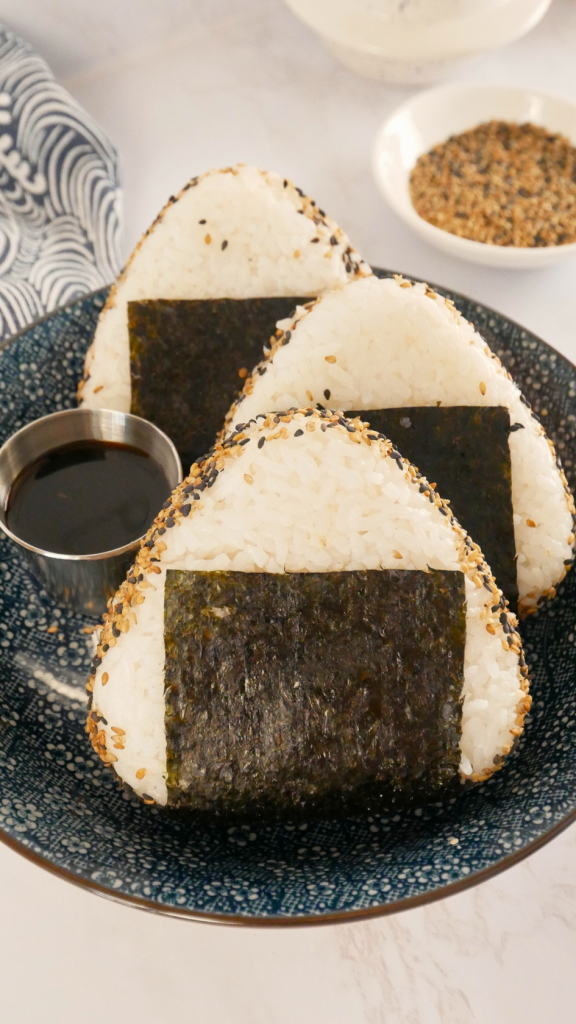
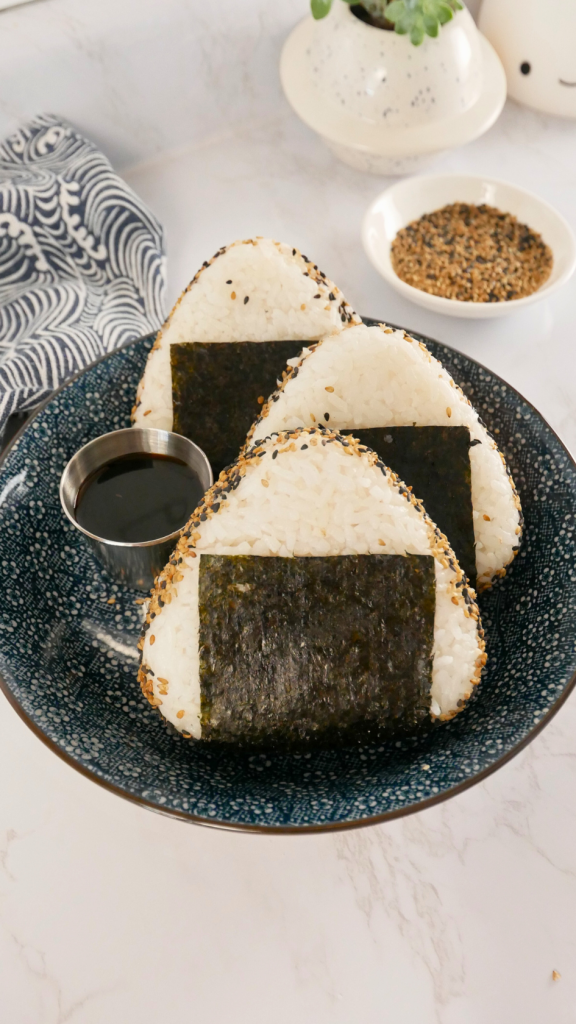
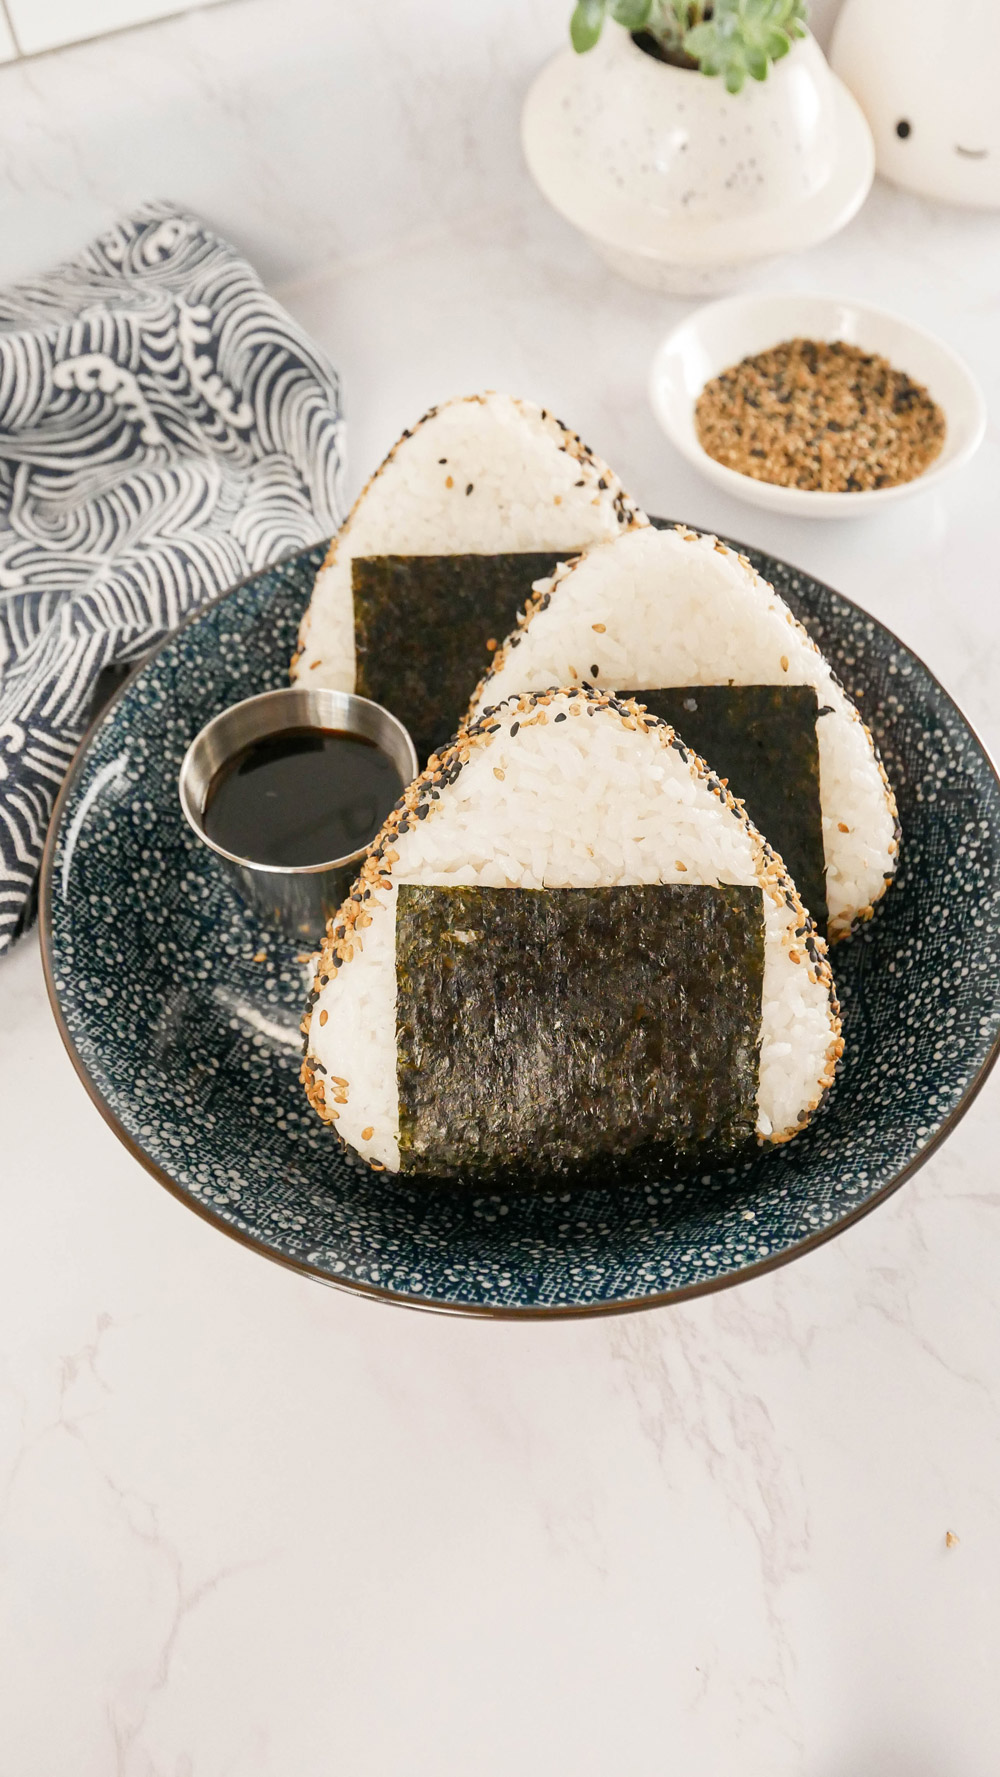
Don’t forget to roll the onigiri in toasted sesame seeds or furikake to enhance the aesthetic and taste of the onigiri!
Salted Salmon Onigiri Ingredients & Substitutions
Salmon: salmon is the star of the show so you want to use the highest quality and freshest salmon you can find. You can also substitute salmon with other seafood, including shrimp, tuna, or crab. I also have a list of other filling variations that you can check out below.
Cooked rice: any type of short-grain rice (or sushi rice) will work well for this recipe. But if you can, koshihikari sushi rice is best because of its sticky consistency. You could substitute short-grain rice with medium-grain rice however, long-grain rice would not work for this because it is not as sticky or starchy.
Salt: salt is used to season the salmon. As the name suggests, Shiozake or ‘salted salmon’ should be on the saltier side, which will be balanced out by the rice. Feel free to adjust the amount of salt added based on your preferences. You’ll also need a pinch of salt to rub onto your hands when assembling the onigiri.
Nori sheets (roasted seaweed): the nori sheets add a layer of umami and complete the onigiri. I think it’s an essential component of onigiri however you could omit it if you prefer. *Note – nori sheets are the same as sushi nori.
Toasted sesame seeds: the black sesame seeds add a bit of crunch and nutty flavor to the onigiri. You can substitute them with toasted white sesame seeds or furikake.
Onigiri Filling Variations
If you’re looking for some inspiration for onigiri fillings, check out my other onigiri recipes below!
1. Tuna Onigiri – you can never go wrong with canned tuna for a quick and foolproof onigiri. I’ve combined them with some Japanese mayo and sansho peppers for a creamy and delectable onigiri!
2. Mushroom Onigiri – if you’re looking for a vegetarian option, I recommend giving this recipe a try! The mushrooms are cooked in a delicious mentsuyu sauce so every bite is jam-packed with flavor.
3. Mentaiko Onigiri – if you’re a seafood lover, I guarantee you’ll fall in love with this mentaiko onigiri. The flavors of mentaiko or spicy cod roe go well with the nuttiness of the sesame oil, making it an unforgettable onigiri.
4. Crab Onigiri – made with imitation crab or ‘kani’, this crab onigiri recipe is incredibly easy to prepare. Only 5 ingredients are required for the filling (excluding salt and ground black pepper).
5. Spam Onigirazu (with Kimchi & Egg) – onigirazu is slightly different from an onigiri, however, it uses the same ingredients as you would prepare one. The combination of kimchi, egg, and spam makes is makes this hearty and comforting – this one will not disappoint!
How to prepare Salted Salmon Onigiri
To make this quick and easy onigiri, follow the steps below:
Step 1: Prepare the salmon
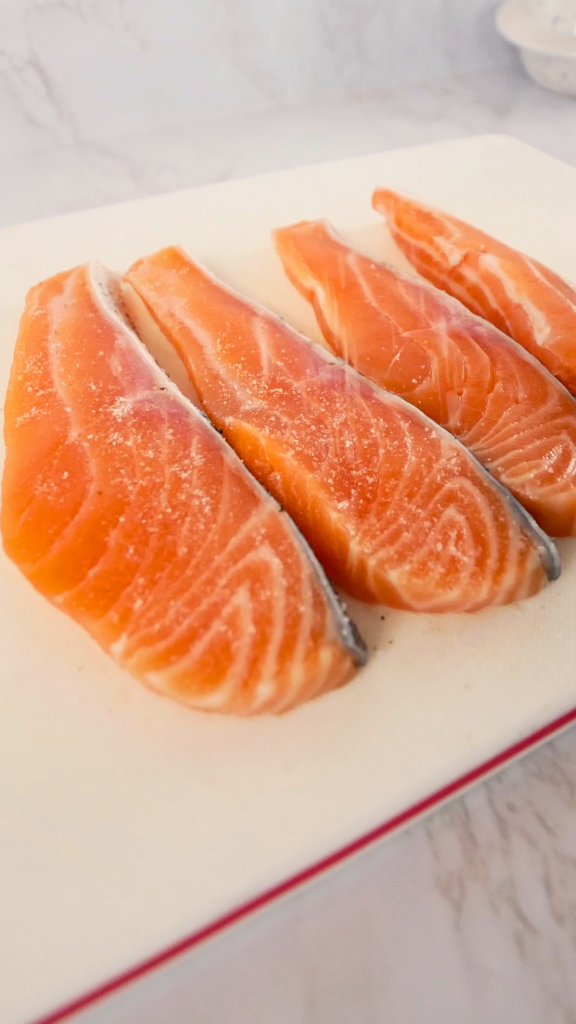
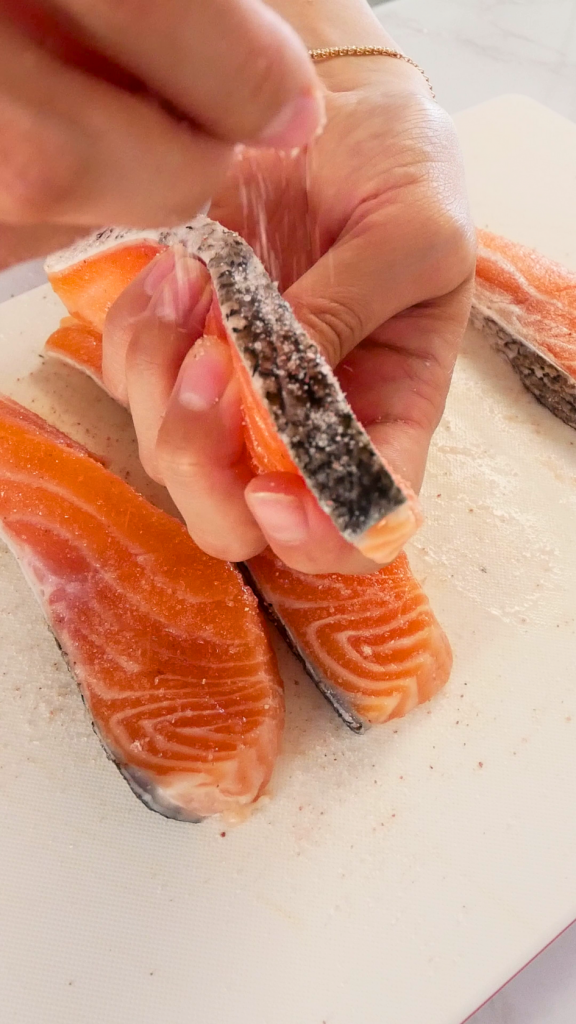
Cut the salmon into ½-inch thick slices and salt generously on all sides.
Step 2: Broil the salmon
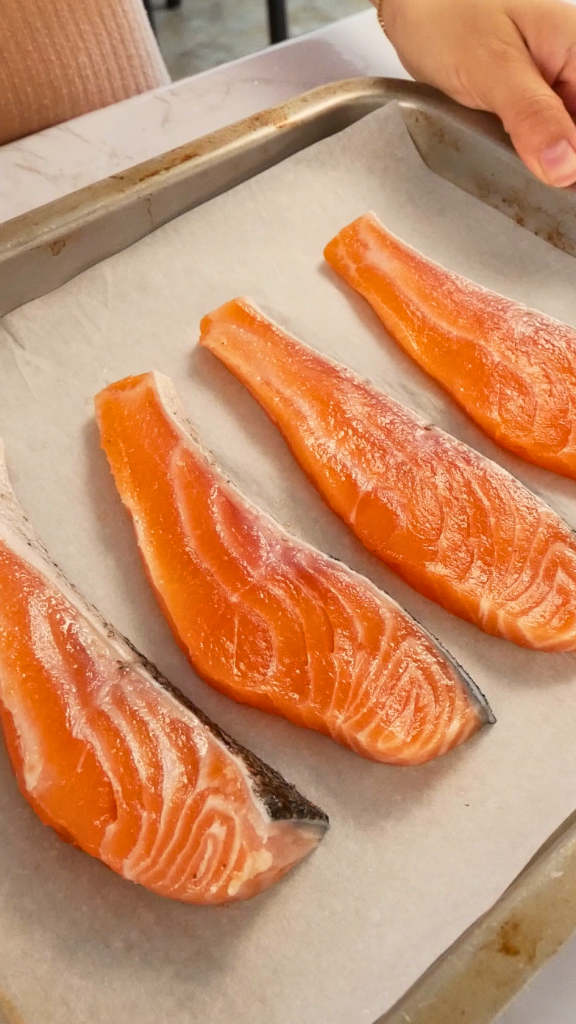

Transfer the salmon to a lined baking tray and place it under the broiler. Let it cook for 10 to 12 minutes or until it turns golden brown and fragrant. You can also bake it in a 400F (205C) oven for 12 to 15 minutes or pan-fry it for 8 to 10 minutes, making sure to flip halfway.
Step 3: Cut the salmon and prepare the rice
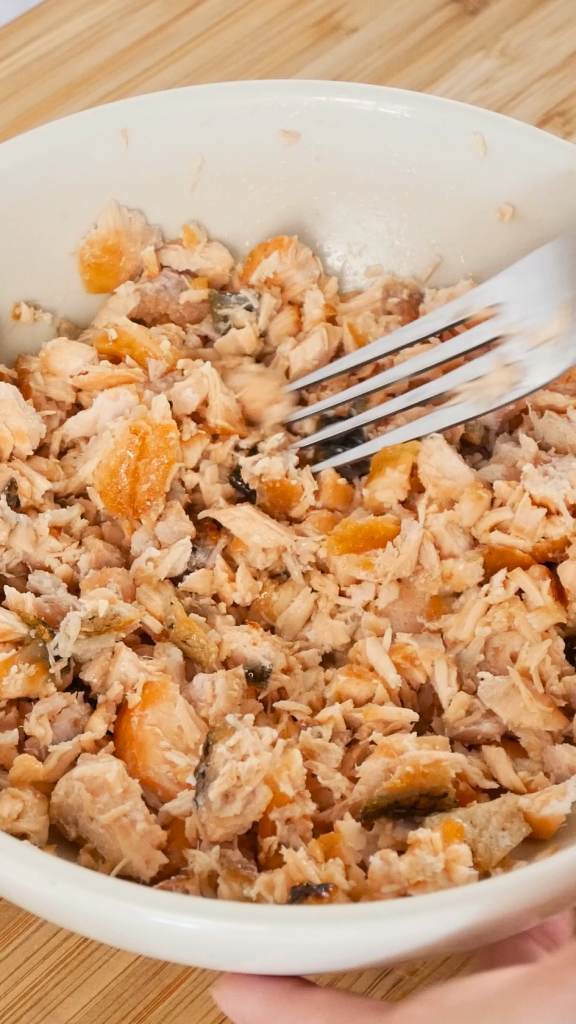
Once the salmon is cooked, take it out of the broiler and cut it into smaller pieces with a scissor.
If you’ve cooked fresh rice for this recipe, let it cool down to room temperature so you don’t burn yourself when shaping!
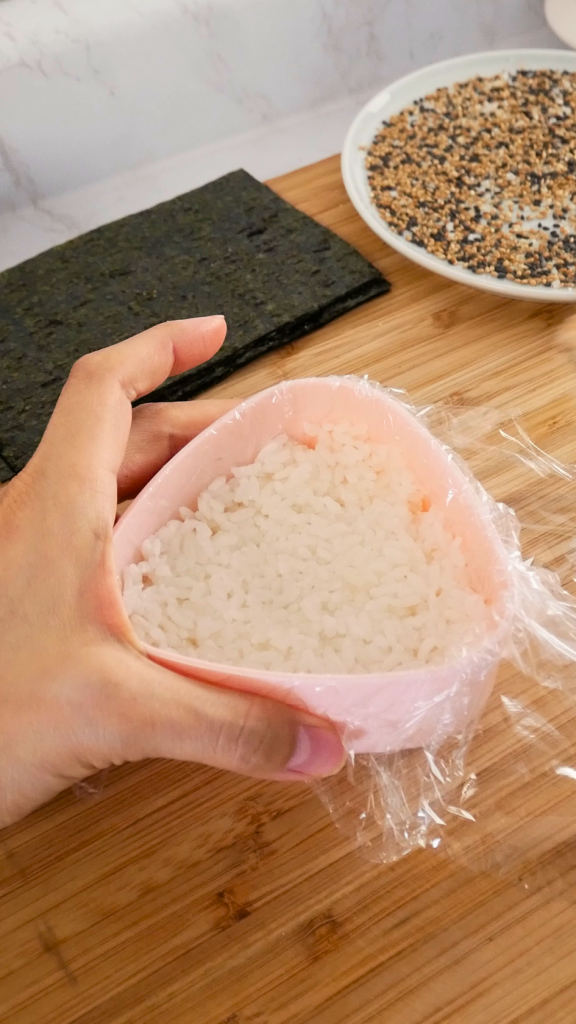
Step 4: Shape the onigiri
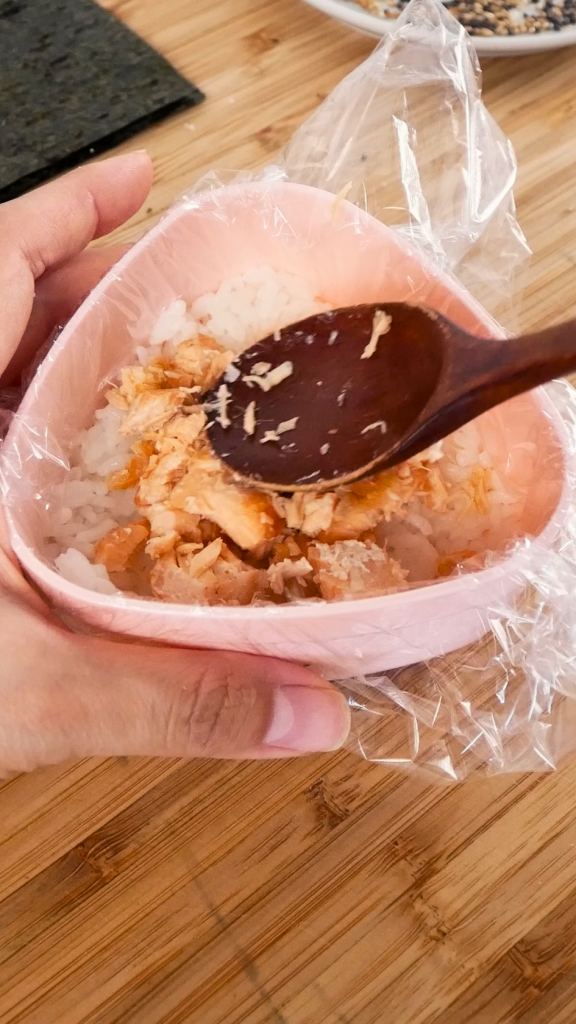
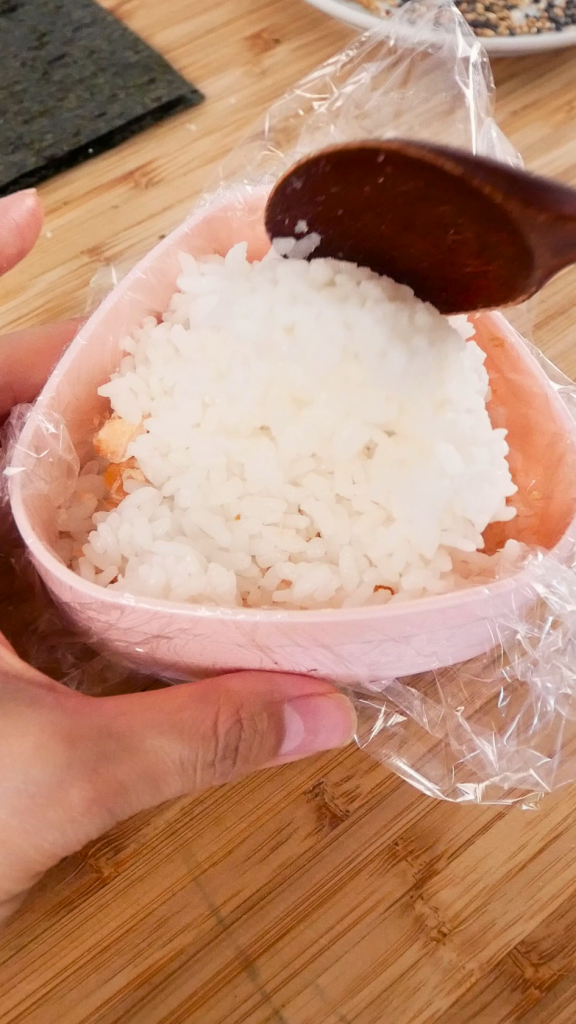
If you’re shaping it by hand, wet your hands with cold water then place a sprinkle of salt on your hands. Grab about ¼ cup of rice and flatten it out on your palms. Then, place 1 to 2 tablespoons of the salmon in the center. Top it with ¼ cup of rice and press it down so the rice on top sticks to the rice on the bottom. With your palms, apply pressure and shape the onigiri into a triangle. This may take some practice and a few tries, but you’ll get the hang of it in no time.
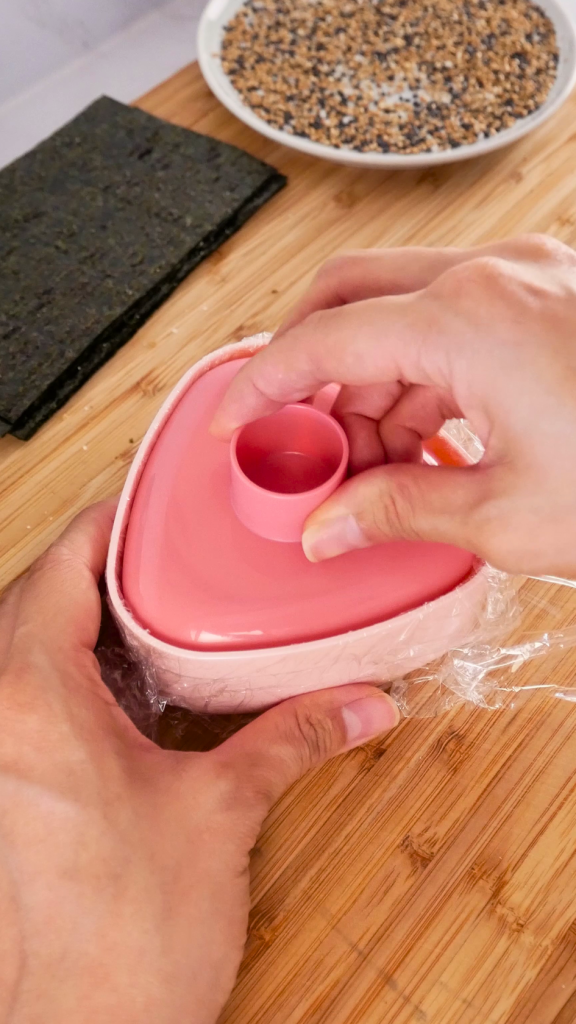
If you’re using a mold to shape the onigiri, just follow the instructions according to the package.
Step 5: Add the sesame seed and nori
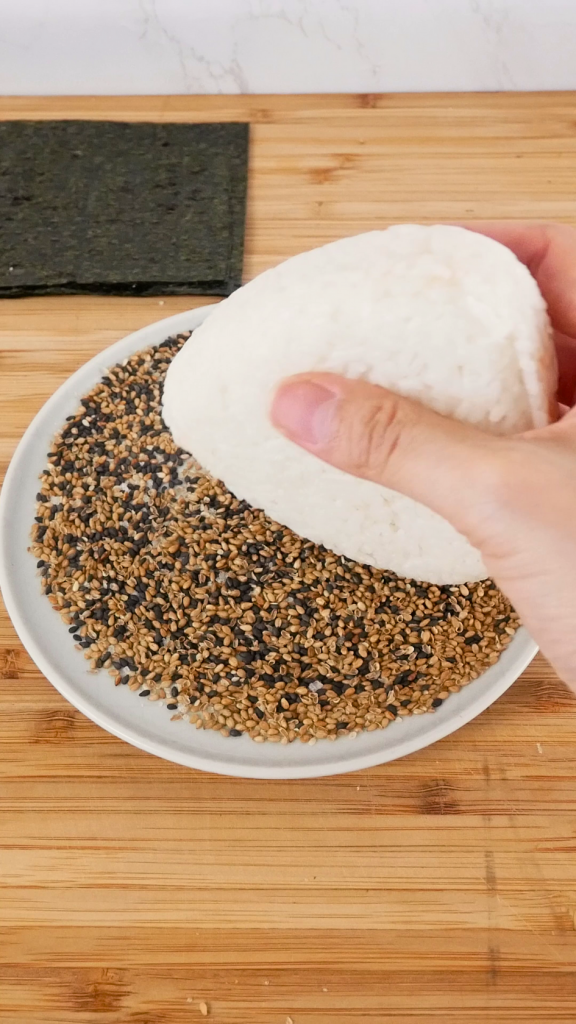
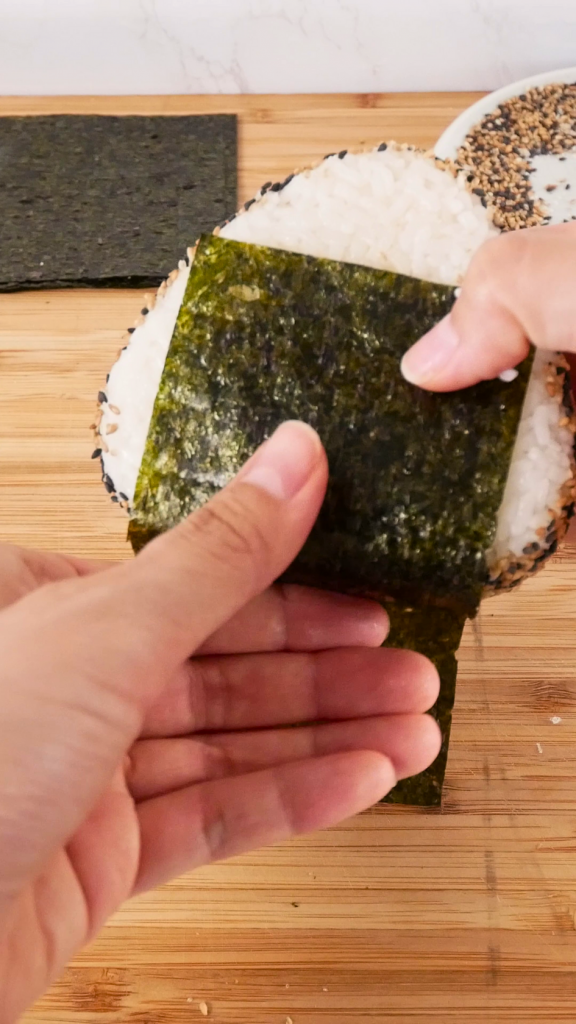
Once you’re done shaping the onigiri, roll the short side of the edges in some toasted sesame seeds. Then, wrap a sheet of nori on the bottom of the onigiri. Repeat the steps until you use up all the rice and salmon. Serve and enjoy!
Preparation tips for Salted Salmon Onigiri
If you’re new to making this salted salmon onigiri recipe, here are a few tips to keep in mind to make the perfect onigiri every time:
- Salmon filets are ideal for this recipe since they are boneless and easier to prepare. You’d want to slice the salmon quite thin, about 1/2 inch thick so they cook faster.
- To impart more flavor to the salmon, set the salmon aside for 10 to 15 minutes after seasoning it with salt. This will slightly ‘cure’ the salmon, making it even more flavorful!
- Aside from broiling, you can also bake the salmon in a 400F (205C) oven for 12 to 15 minutes or pan-fry it for 8 to 10 minutes, making sure to flip halfway. Keep in mind that the salmon is traditionally served well-done, so don’t worry about it overcooking.
- If making the onigiri in advance to serve the next day, wrap the onigiri in plastic wrap and place it in the refrigerator. The plastic wrap will keep the moisture in and prevent the rice from drying out
Frequently Asked Questions
Can I use jasmine rice instead of short-grain rice?
I don’t recommend using jasmine rice or long-grain rice for this recipe. Long-grain rice has lower starch content so it’s significantly drier compared to short-grain rice. As a result, the onigiri will have difficulty keeping its shape because it doesn’t have the same sticky consistency.
What other methods can I cook the salmon?
I prefer broiling the salmon for about 10 to 12 minutes but you can also bake the salmon in a 400F (205C) oven for 12 to 15 minutes or pan-fry it for 8 to 10 minutes, making sure to flip halfway. The salted salmon is traditionally served well-done, so you don’t have to worry about overcooking it.
How do you keep rice from sticking to mold or your hands?
If shaping the onigiri with a mold, I like to layer a sheet of plastic wrap on the bottom of the mold before adding the rice and filling. Once shaped, all you have to do is pull the plastic wrap out of the mold. (You can also watch the video below to see how I do it!)
If you’re shaping by hand, I recommend wetting your hands and sprinkling a pinch of salt before working with the rice. Not only does the salt flavor the rice, but it also creates a rough surface to prevent the rice from sticking to your hands. I suggest using coarse salt so they don’t dissolve quickly. Lastly, be careful with how much salt you add or else the onigiri will turn out too salty. Just a pinch is enough!
Can I store Salted Salmon Onigiri?
Yes, the onigiri can be stored in the fridge. In fact, you can even make them in advance and place them in the fridge until they’re ready to eat. Just make sure to wrap them individually with plastic wrap to prevent them from drying up and sticking to each other. Remember to eat the onigiri within 24 hours before the rice completely hardens up.
Looking for more easy and delicious Japanese-inspired recipes? Here are some of my favorites!
1. Pork Katsudon – this tender, crispy, and juicy katsudon recipe is a staple in Japanese cuisine, and I guarantee this rice bowl will be sure to hit the spot.
2. Miso Marinated Cod – for a light and healthy meal, I highly recommend this delicious cod recipe!
3. Mentaiko Udon – if you love mentaiko filled inside onigiri, I guarantee you’ll love it with udon. It’s a creamy and spicy dish that’s perfect to indulge your palate.
4. Spicy Salmon Poke Bowl – for a quick 10-minute dish, this spicy salmon poke bowl is jam-packed with flavors. By combining a few pantry staples like mayo, sriracha, soy sauce, rice wine vinegar, and sesame oil, you can create a mouth-watering and filling meal!
5. Uni Pasta – in just 15 minutes, you can easily impress anyone (or yourself) with this sweet and briny uni pasta! Perfect for special occasions and date nights at home.
Salted Salmon Onigiri Recipe (Shiozake)
Ingredients
- 8 oz salmon skin on
- 3 cups cooked rice short grain or medium grain rice
- 1/2 tsp salt to taste
- nori sheets roasted seaweed
- toasted black sesame seeds for garnish
Instructions
- Cut the salmon into 1/2 inch thick slices. Salt generously on all sides. Transfer the salmon to a lined baking tray and broil for 10 to 12 minutes until browned. You can also bake it in a 400F (205C) oven for 12 to 15 minutes or pan-fry it for 8 to 10 minutes, making sure to flip halfway.
- Using a scissor, cut the salmon into small pieces. If you have freshly cooked or warmed rice, allow it to cool to room temperature so you don't burn yourself when shaping.
- Let's shape the onigiri! If using a mold, follow the instructions according to the package.
- If you're shaping by hand, wet your hands with cold water and place a sprinkle of salt on your hands. Grab about 1/4 cup of rice and flatten it out on your palms. Place 1 to 2 tablespoons of the salmon in the center. Top with 1/4 cup of rice and press it down so the rice on top sticks to the rice on the bottom. Using your palms, apply pressure and shape the onigiri into a triangle. This may take some practice and a few tries.
- After the onigiri is shaped, roll the short edges in toasted black sesame seeds and wrap a sheet of nori on the underside of the onigiri.
- Serve and enjoy!
- *Onigiri's can be made in advance and can be eaten cold too! To serve the next day, wrap the onigiri in plastic wrap and place in the refrigerator. The plastic wrap will keep the moisture in and prevent the rice from drying out*
Notes
- Feel free to use any filling you like!
- Onigiris can be made in advance and can be eaten cold too! To serve the next day, wrap the onigiri in plastic wrap and place it in the refrigerator. The plastic wrap will keep the moisture in and prevent the rice from drying out
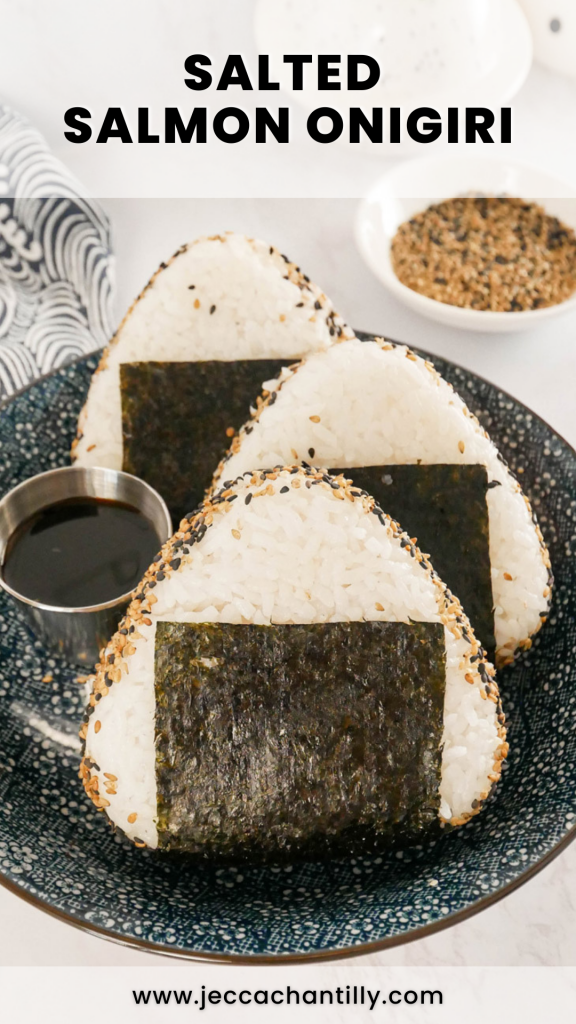
Pin & save this recipe for later!
*Disclosure: I only recommend products I would use myself and all opinions expressed here are my own. This post may contain affiliate links where I may earn a small commission, at no additional cost to you. *
Very tasty and easy to make. I make these for my kids and they love it!
Hi Monica! So delighted that you and your kids love this recipe 🙂