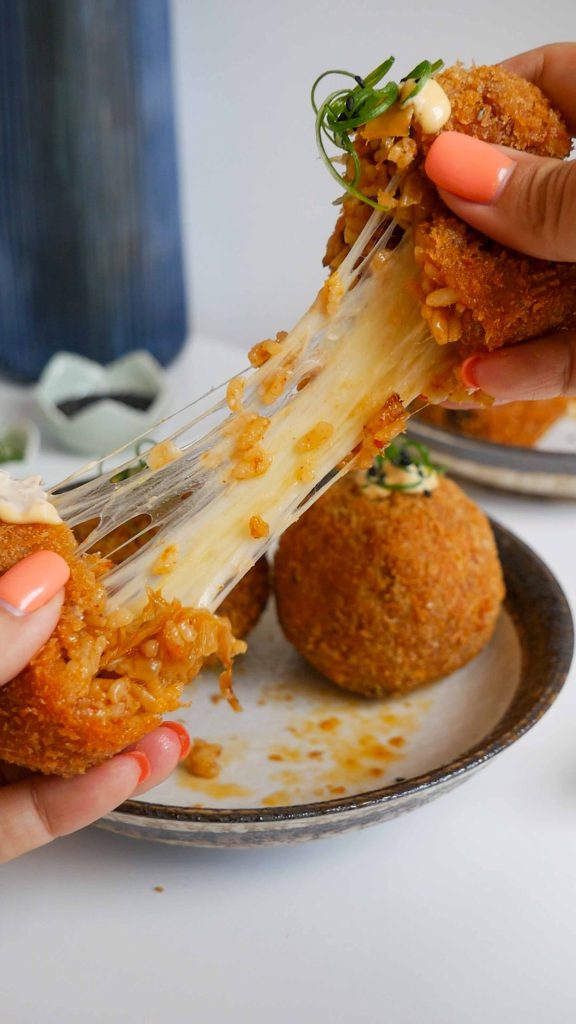
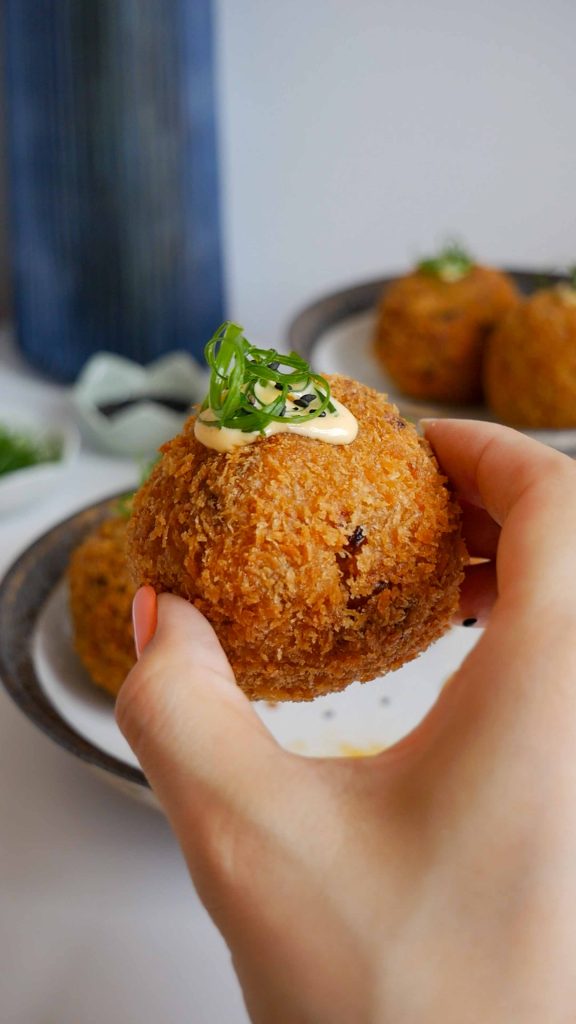
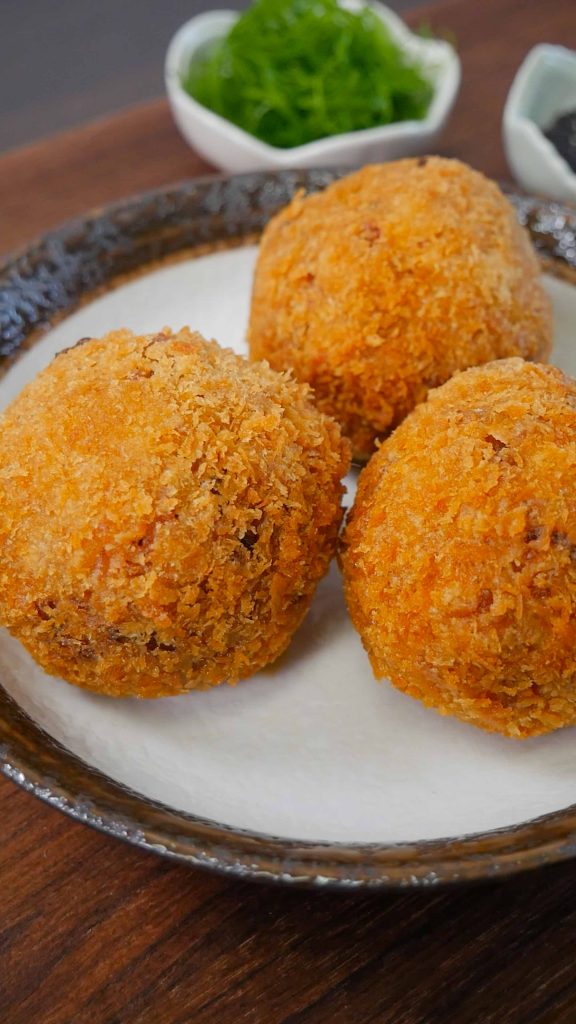
Today we’re turning kimchi fried rice into cheesy fried rice balls! These rice balls have everything I love in one bite and it’s the ultimate comfort food snack.
These luscious balls are made with kimchi fried rice with an ooey-gooey cheesy center and a crispy golden brown deep-fried outer shell. It comes with a super umami-rich kimchi dipping sauce on the side to complete the dish. Each bite is a mix of tangy, savory, and cheesy flavors – it’s just so darn comforting! If you love kimchi fried rice and cheese, you’re going to love these kimchi cheese rice balls!
These kimchi cheese rice balls are delicious to enjoy on their own. But if you want, you can pair them with my favorite side dishes including:
- Radish Salad
- Asian Pickled Cucumbers
- Pickled Brine Fries with Gochujang Mayo
- Rainbow Salad with Creamy Sesame Dressing
- Korean Corn Cheese Dip
- Japchae Dumplings
Why you’ll love this recipe
This recipe is inspired by Italian arancini balls, which are essentially fried balls of risotto stuffed with cheese in the center. Now this is obviously my Korean-fusion take on it so in no way is this authentic but it’s absolutely delicious.
Kimchi is such a versatile ingredient, and I love making fusion dishes like my kimchi chili hot dogs, kimchi grilled cheese, and these incredibly delicious cheesy rice balls. It lends its tangy, spicy, and umami-rich flavors to the rice and the dipping sauce as well.
In my opinion, kimchi and cheese are like a match made in heaven. Both are unique on their own and deliciously complement one another. The sour, rich, and complex kimchi is balanced by the mild creamy cheese and texturally, they just work!
The best part about this recipe is the contrasting textures. Starting from the crunchy panko breading and the softened kimchi to the tender rice and the gooey, melty cheese. Each bite is an explosion of flavors and textures – and I love it!
Since they’re formed into balls, they’re quite fun to make and fun to eat as well. They make the perfect on-the-go snack and are great for picnics, lunch for work, or road trips. You can even make them ahead of time, freeze, and thaw and fry when ready to eat! That will significantly save you time and you’ll have hot and fresh kimchi cheese rice balls in just a few minutes.
Kimchi Cheese Rice Balls Ingredients & Substitutions
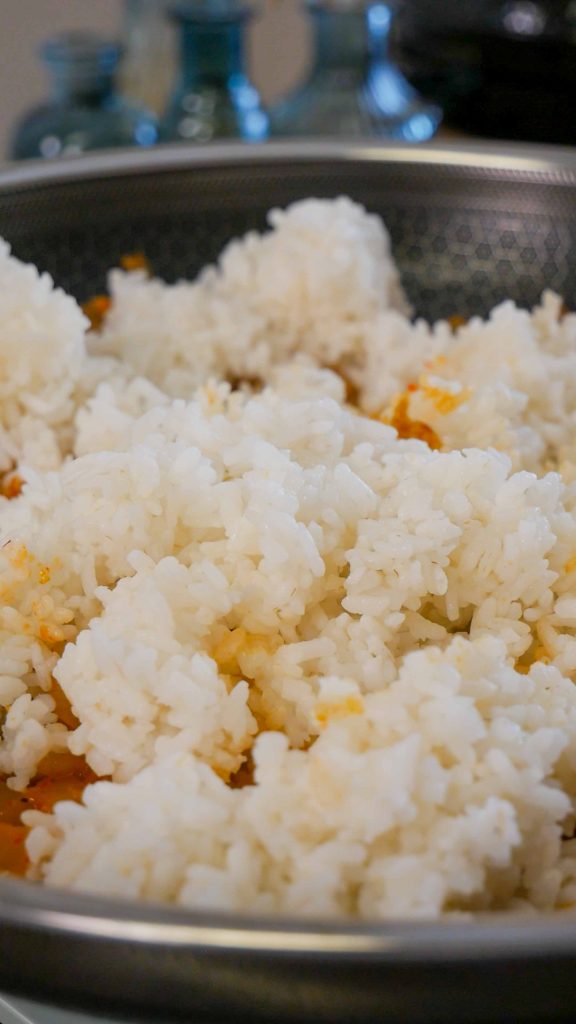
Day-old cooked rice: When it’s fried rice, it’s got to be cold day-old rice. You want to use cold day-old rice because this dries out the rice and prevents it from sticking together. I recommend using short or medium-grain rice because they are starchier than long-grain rice. Long-grain rice like basmati and Jasmine rice will not hold shape.
Kimchi: For kimchi fried rice, old, sour, and well-fermented kimchi is a must. Older kimchi will add a deeper and more complex flavor! If you only have fresh kimchi, add a splash of vinegar and it should work.
Unsalted butter: For sauteing. Butter also adds another layer of richness and creaminess to the kimchi fried rice.
Kimchi juice: This is what gives most of the kimchi flavor as it’s used to moistens up the rice. Also used for the kimchi mayo sauce.
Soy sauce: Adds saltiness and umami and deepens the color. My go-to brand is Sempio.
Gochujang: Gochujang is a fermented Korean red pepper paste that’s essential for Korean-style fried rice. It adds another layer of umami, spiciness, sweetness, and color.
Sesame oil: Adds a delicious nuttiness that’s traditionally used in Korean kimchi fried rice. I like to use Kadoya toasted sesame oil.
Parmesan cheese: This is mixed into the rice for extra umami, flavor, and saltiness
Mozzarella cheese: For an ooey-gooey cheesy center! I shredded a block of mozzarella cheese because it gives the best cheese pull but you can also just cut them into cubes. This can be substituted with other types of cheese that you prefer including gouda, pepper jack, Monterey jack, and cheddar.
Neutral oil: For deep frying. You can use corn, peanut, canola, vegetable, sunflower, or grapeseed oil. My personal preference is avocado oil.
Fry Coating Ingredients & Substitutions
All-purpose flour: Adds a layer of coating on the kimchi fried rice so that the egg has something to adhere to
Eggs: Acts as a glue between the flour and Panko breadcrumbs
Panko breadcrumbs: This is a Japanese-style bread crumb made from pure crustless white bread. They also make the fried goods dryer and less greasy. But of course, you can substitute it with whatever breadcrumbs you already have on hand.
Salt: To season the coating
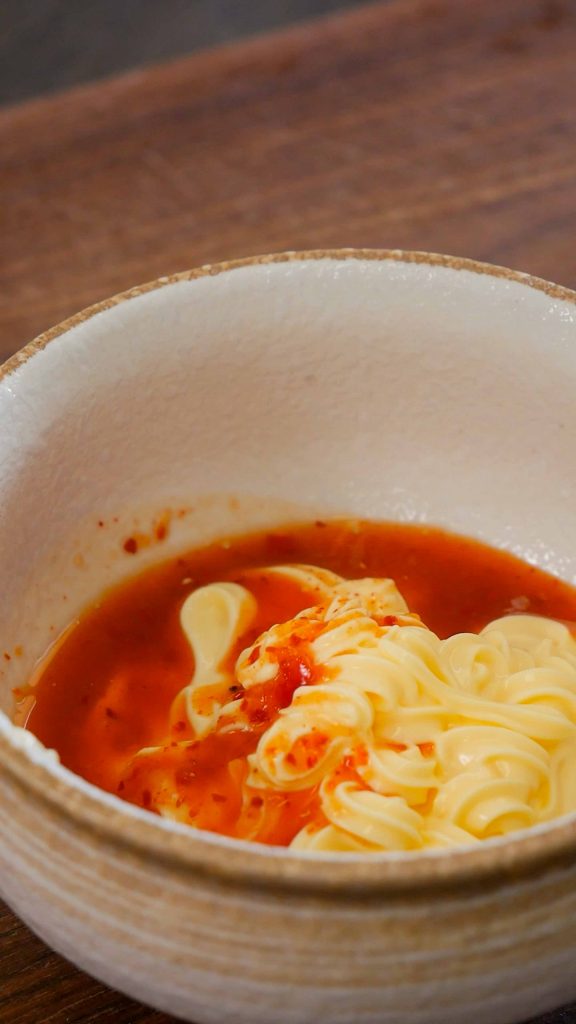
Kimchi Mayo Sauce Ingredients & Substitutions
Japanese mayo: This Kewpie Japanese mayo is made using just egg yolks, making it richer, creamier, and slightly sweeter than regular mayo. I highly recommend using this but if it’s not available, regular mayo can be used.
Kimchi juice: Also for more flavor
Garlic clove: For added spice and depth of flavor
Garnish Ingredients & Substitutions
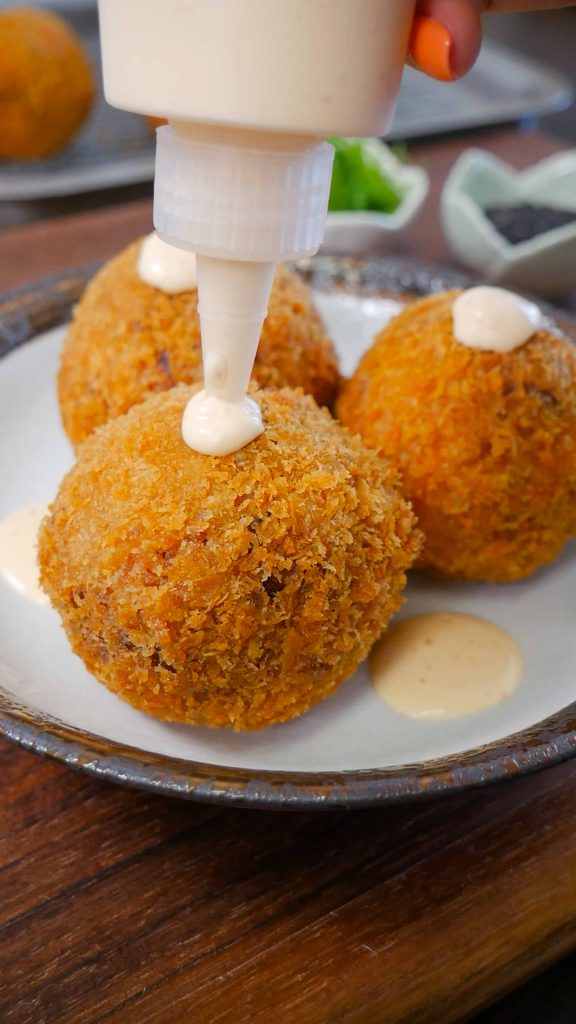
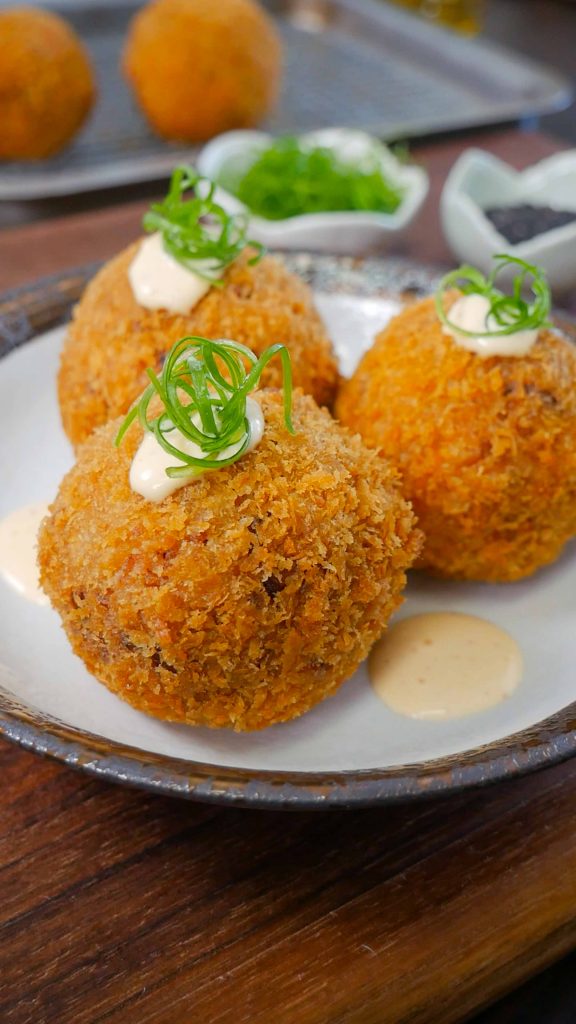
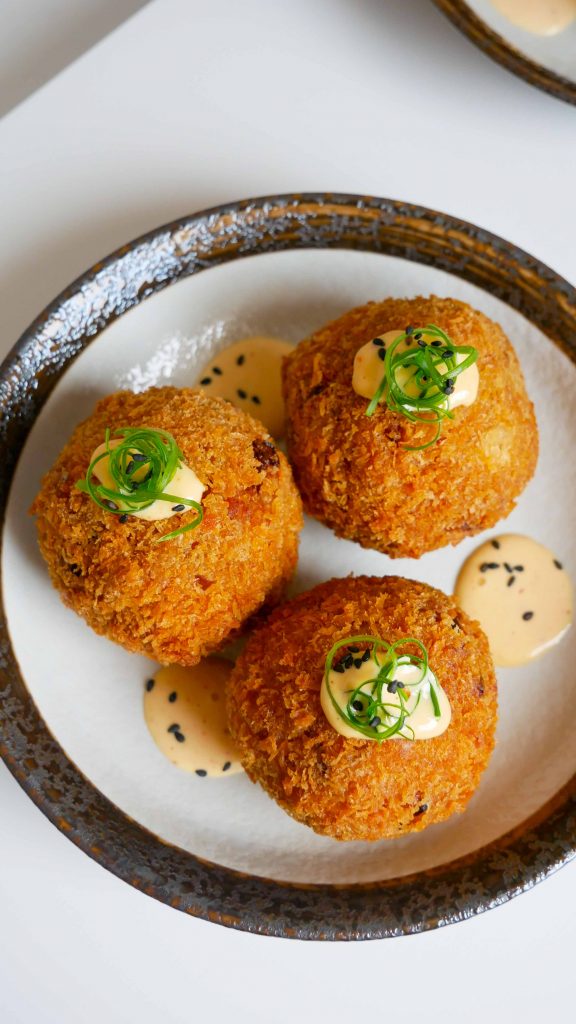
Kimchi mayo: Creamy and tangy dip made by combining Kewpie, kimchi juice, and garlic.
Scallions: Adds freshness. This can be substituted with your favorite herbs.
Black sesame seeds: For garnish and added crunch. You can use toasted white sesame seeds.

How to Prepare Kimchi Cheese Rice Balls
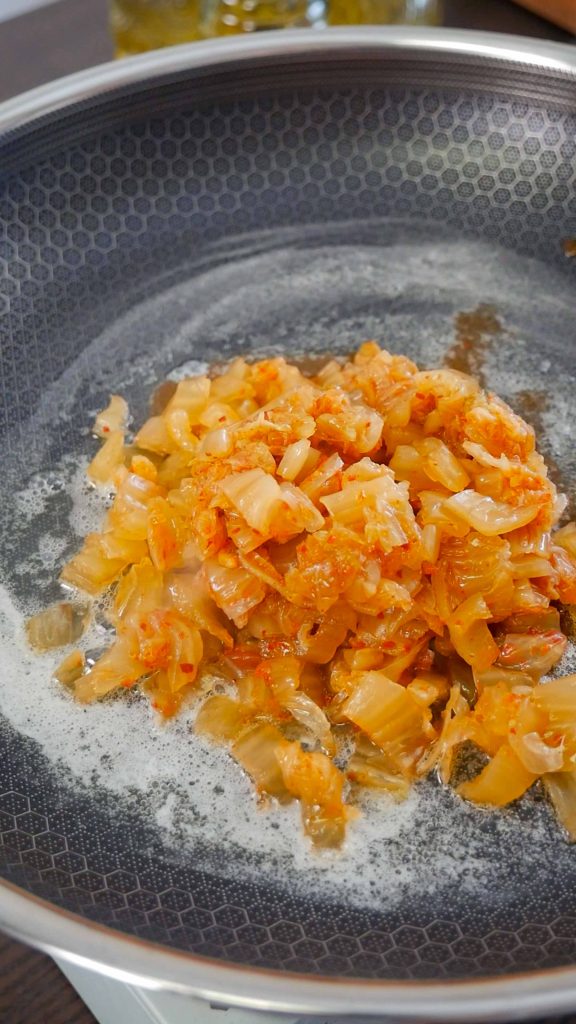
Step 1: Saute the kimchi and add the rice
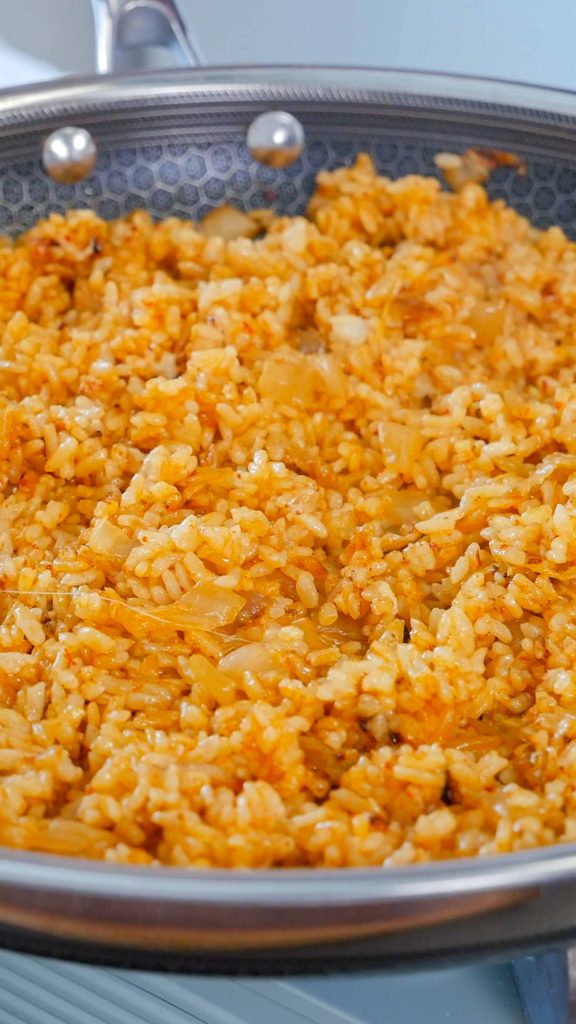
In a pan, melt unsalted butter over medium heat. Toss in the kimchi and saute for 1 to 2 minutes. Add rice and break it up using a spatula then mix well.
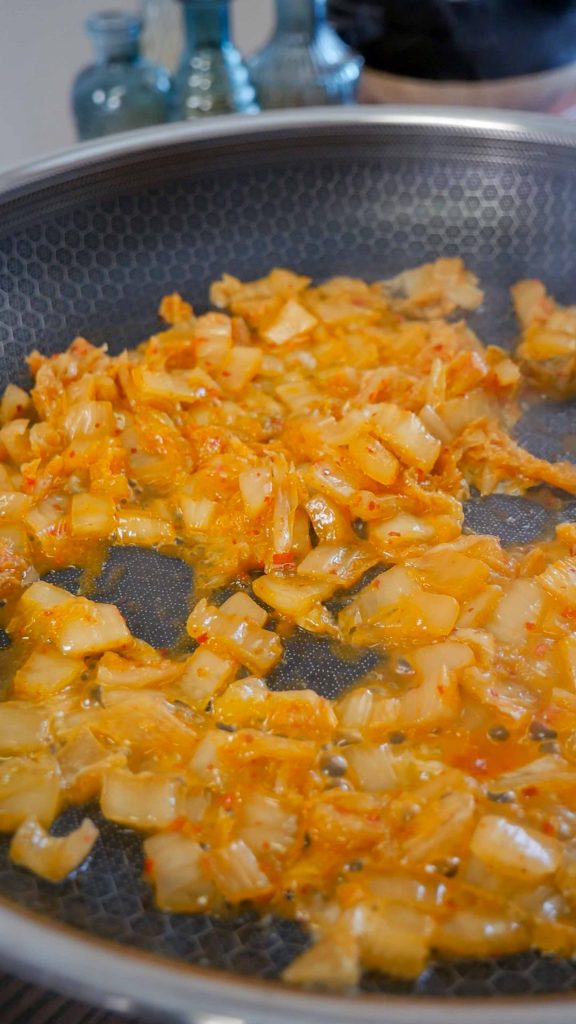
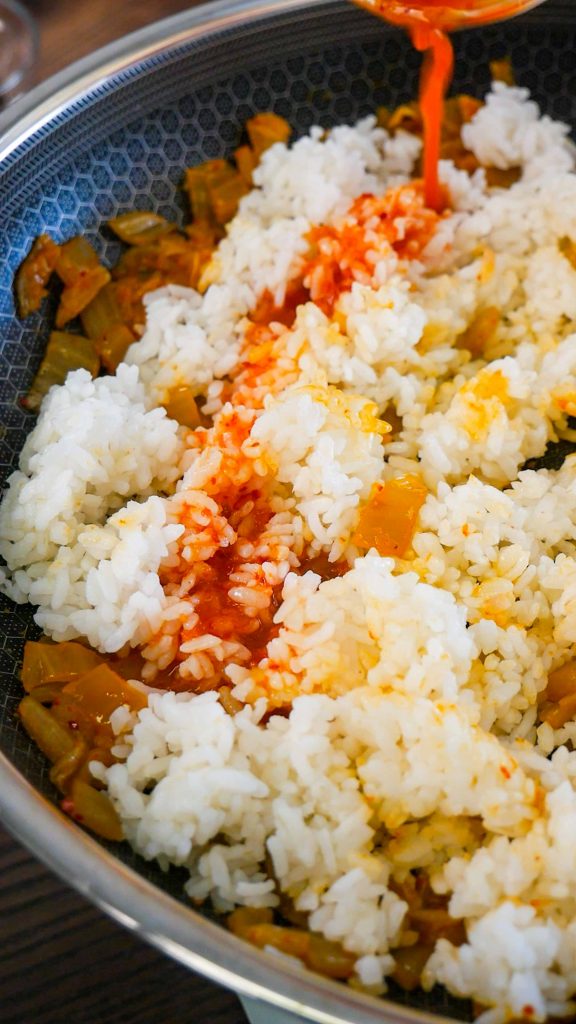
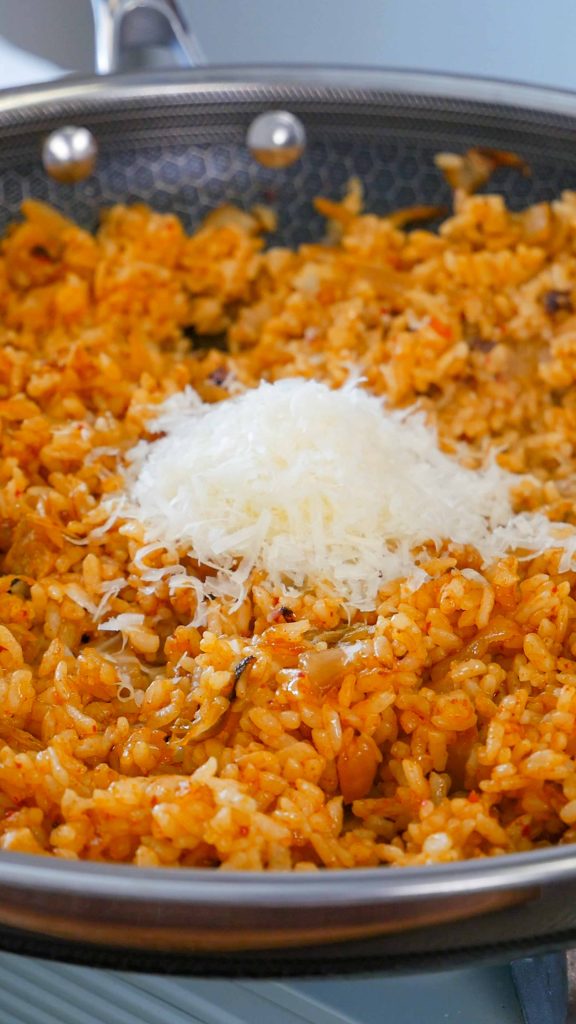
Step 2: Add the seasoning ingredients
Season the rice with kimchi juice, soy sauce, gochujang, and sesame oil. Add the parmesan cheese and stir to mix well.
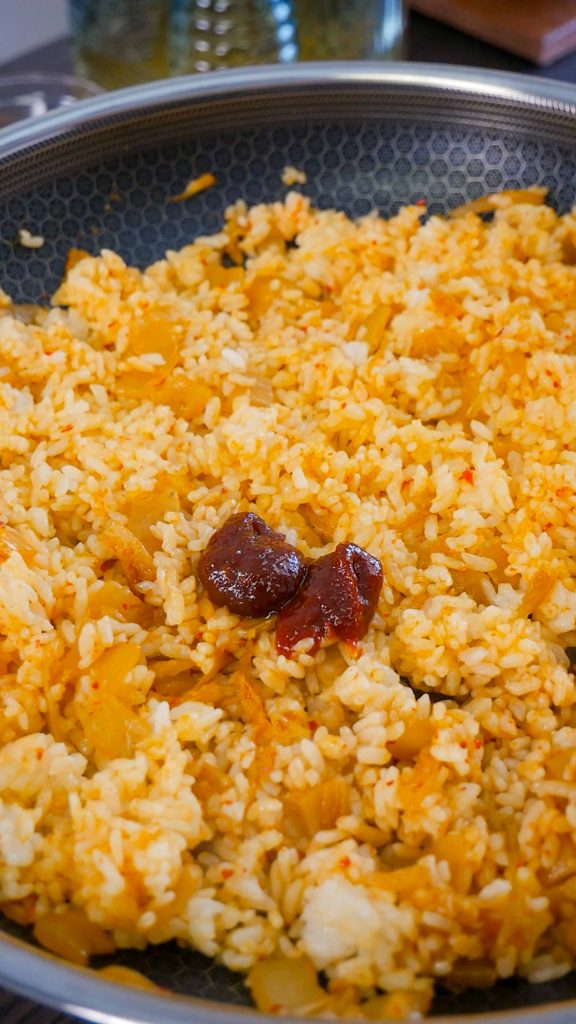
Step 3: Stir fry and cool
Stir fry for another 1 to 2 minutes. Transfer the rice to a bowl and set aside to cool completely.
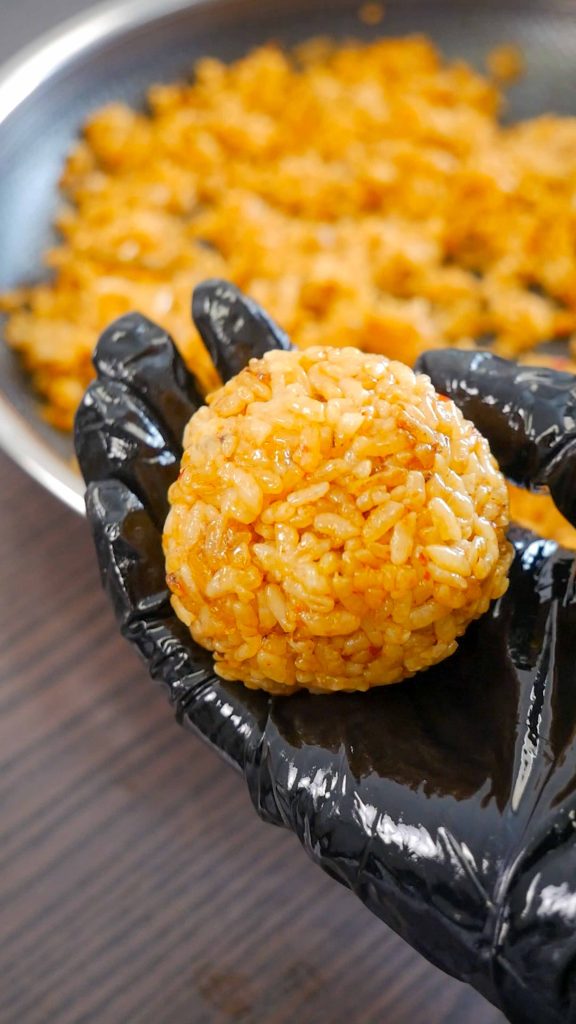
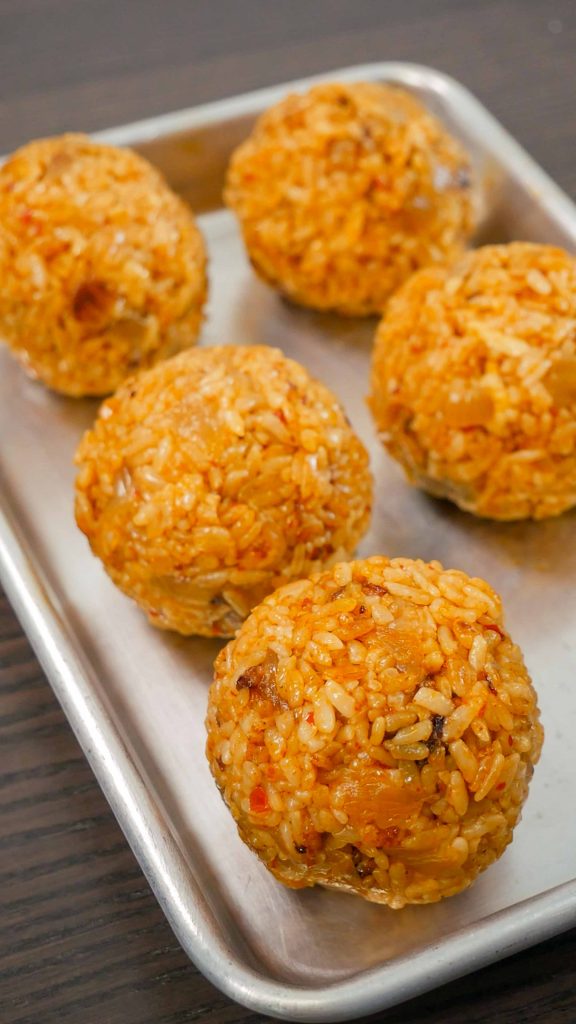
Step 4: Shape the rice balls
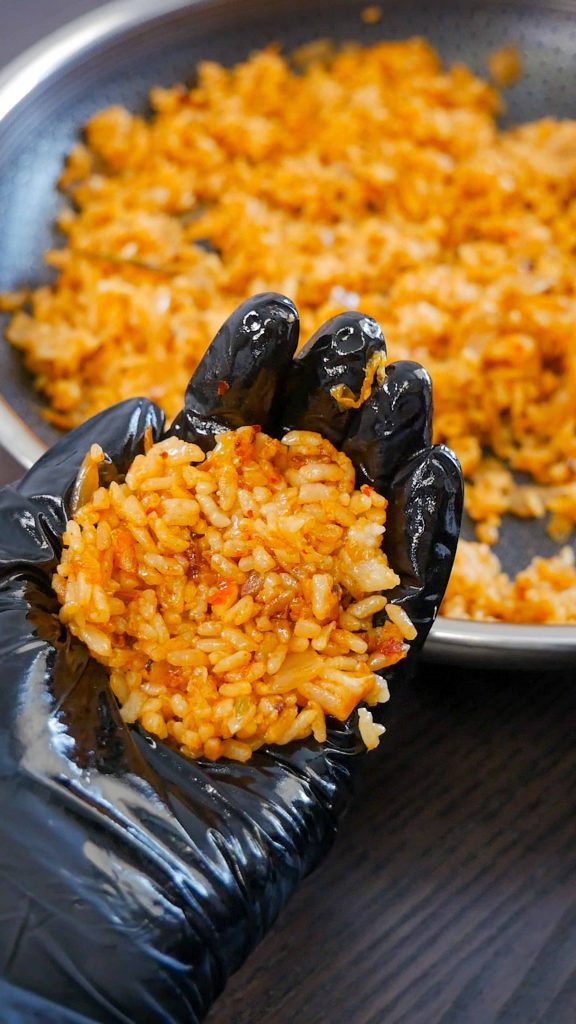
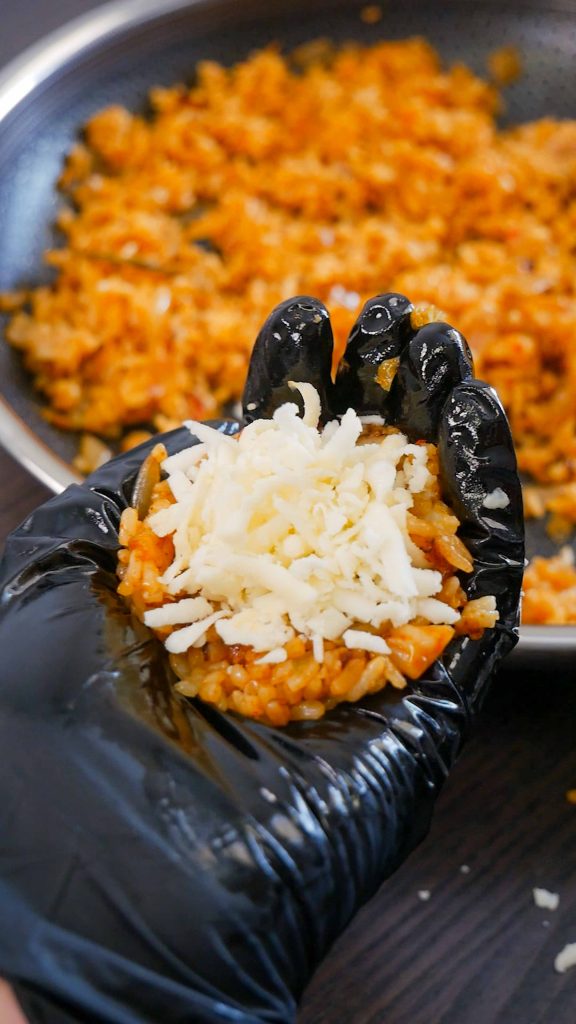
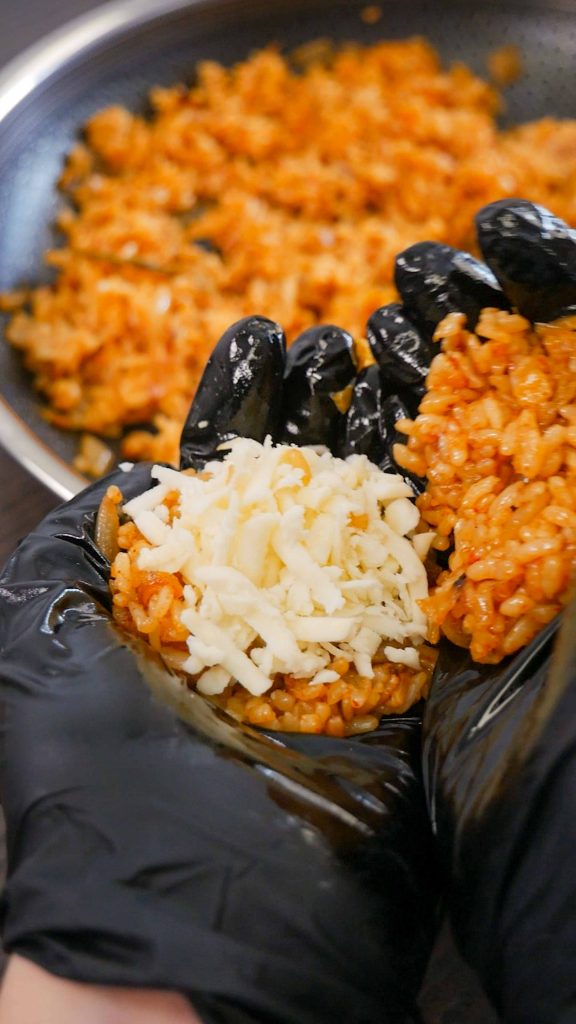
Once the rice has cooled to the touch, grab about 2 tablespoons of fried rice onto your hand. Flatten it out into a disk then place 1 tablespoon of shredded mozzarella cheese in the center. Cover with another 2 tablespoons of fried rice then form into a ball. Make sure to squeeze the fried rice balls with the palms of both hands so they stick together.
*You can make the balls in advance and store them in the fridge until ready to fry.
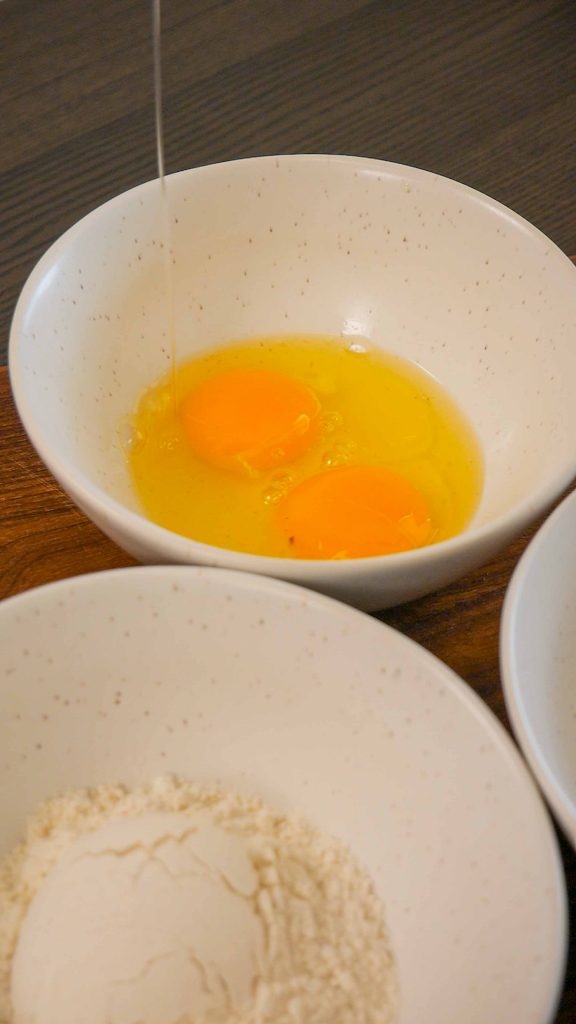
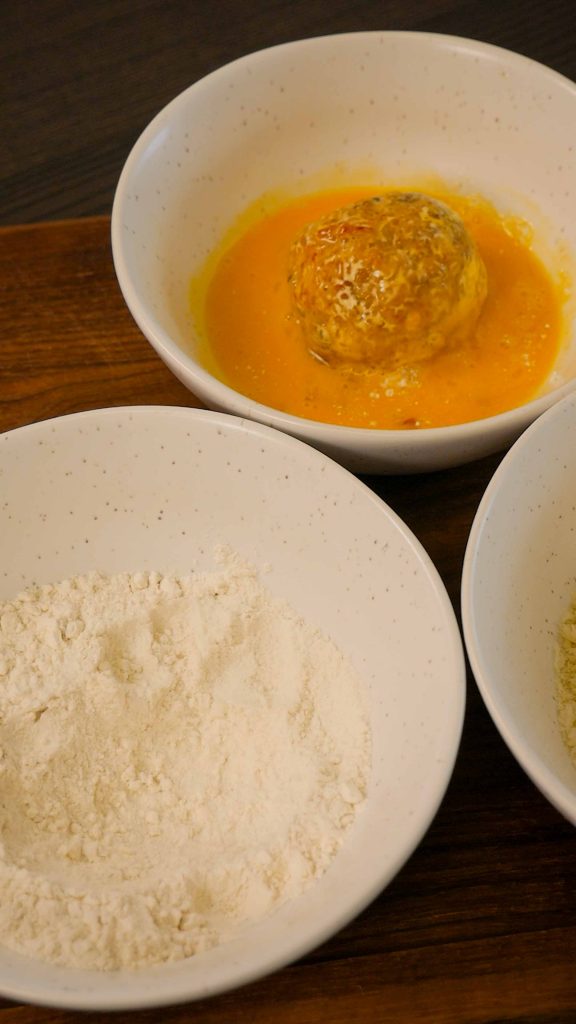
Step 5: Prepare the frying station
Next, prepare your fry coating stations. In a shallow plate or bowl, mix together all-purpose flour and 1/2 teaspoon salt. In a separate shallow plate or bowl, crack the eggs and whisk until homogenous. In another shallow plate or bowl, mix together panko breadcrumbs and 1/2 tsp salt.
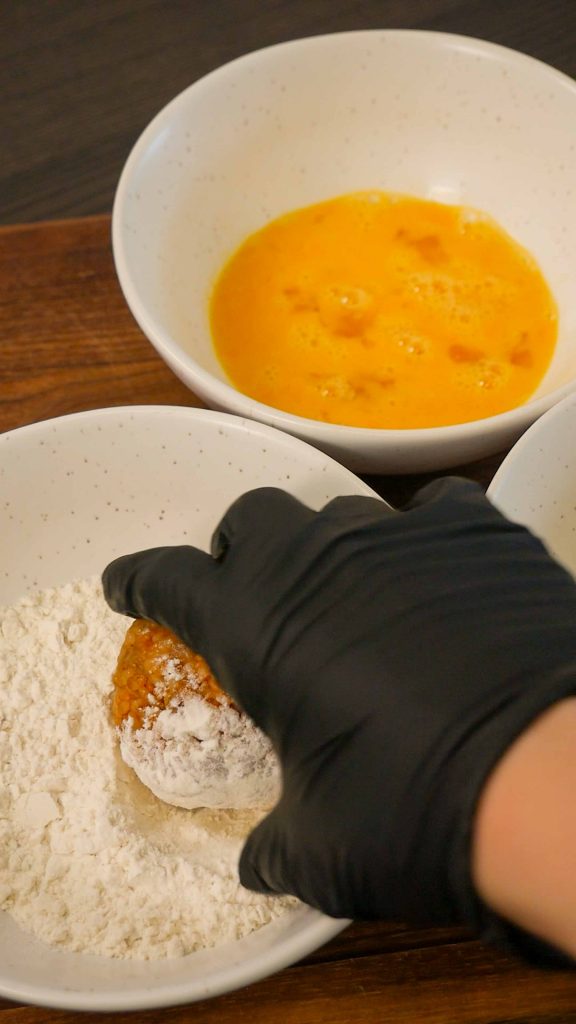
Step 6: Coat the rice ball
Coat the kimchi rice ball in the flour then into the egg, making sure all sides are evenly coated. Transfer it to the panko breadcrumbs and gently press the breadcrumbs into the kimchi rice ball so it adheres better.

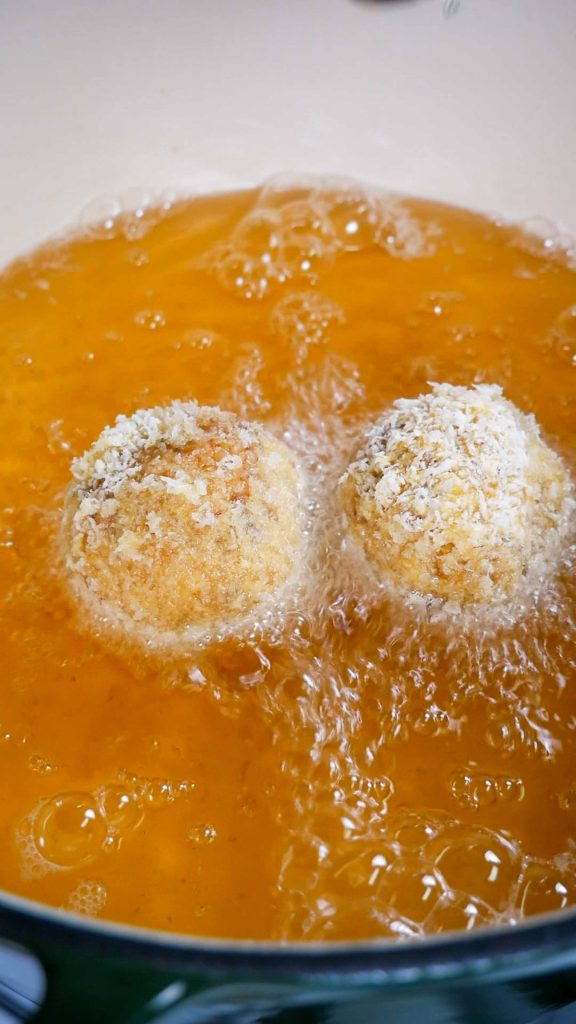
Step 7: Deep fry the rice balls
In a deep pot or pan, fill it up halfway with neutral oil. Heat to 375F or 190C. Carefully place the rice balls into the hot oil. I recommend working in batches to prevent the pot from overcrowding. Fry for 3 minutes or until golden brown and crispy.
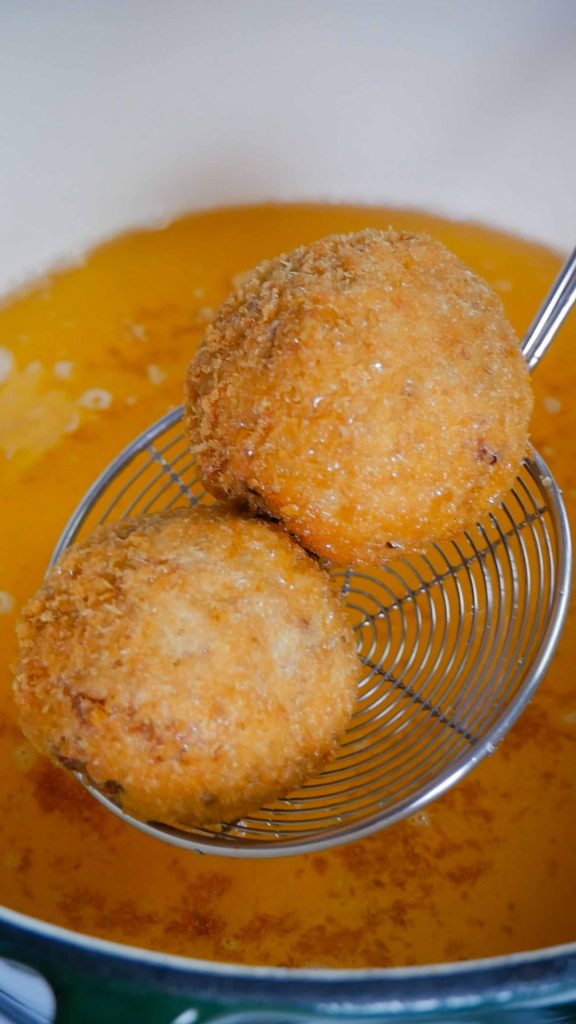

Step 8: Cool, garnish, and serve with sauce
Transfer to a wire rack to cool. Serve with Kimchi Mayo Sauce and garnishes. Enjoy!
Kimchi Mayo Sauce
Combine sauce ingredients
In a small mixing bowl, combine Kewpie mayo, kimchi juice, and grated garlic. Stir to mix well. Store in the fridge for up to 1 week.
Preparation Tips for Kimchi Cheese Rice Balls
Here are some helpful tips for making the best kimchi cheese rice balls every time:
- Use sour, well-fermented kimchi for a richer and deeper flavor. As kimchi sits, it continues to ferment which creates complexity. If using fresh kimchi, add a splash of vinegar and it should be fine.
- Freshly shredded cheese will melt faster and better, so I highly recommend grating the cheese at home yourself. Fun fact: pre-shredded cheese is mixed with cornstarch which actually prevents the cheese from melting.
- To prevent rice from sticking to your hands, use food-grade gloves or wet your hands with cold water when shaping the rice balls.
- When coating the rice balls with flour and egg, make sure to shake off the excess. For the panko breading, gently press the breadcrumbs into the rice ball so it adheres better.
- Preheat the oil to the right temperature before frying. Otherwise, the rice balls will just soak up all the cold oil and turn out really greasy. I highly recommend using a kitchen thermometer for accurate measurement. Alternatively, to test if the oil is hot enough, dip the tip of a wooden chopstick. If you see tiny bubbles floating around it, it’s a good indicator that the oil is hot enough.
- Let the fried kimchi rice balls rest on a wire rack with ample space in between, which will allow air to circulate throughout the balls. This ensures that the rice balls will stay crispy throughout. If you don’t have a wire rack, you can rest them on a paper towel or crumpled aluminum foil.
- Make these kimchi cheese rice balls ahead of time! To do this, prepare the recipe up to step 6. Lay the coated rice balls on a baking tray, freeze them, transfer them into ziploc bags, then store them in the fridge for up to a month. When ready to serve, simply thaw for a few minutes then deep fry.
- Make it spicier by adding a dash of gochugaru or chopped chili peppers as you prepare the fried rice.

Frequently Asked Questions
Is kimchi and rice healthy?
Yes, both kimchi and rice are healthy. Kimchi is rich in antioxidants, supports gut health, and supports a healthy digestive tract. On the other hand, rice is an excellent source of carbs.
What cheese goes with kimchi?
I like to use a creamy and melty type of cheese like mozzarella. It goes well to balance the sharp and tangy flavor of the kimchi, without being too salty or overpowering. That’s just my preference, but you can use other types of melty cheese like cheddar, American, Swiss, or pepper jack.
What does kimchi fried rice taste like?
As the name suggests, kimchi fried rice is rich in kimchi flavor. It has sour, salty, and umami flavors from the kimchi, and some sweetness from the gochujang, all in perfect balance and harmony with each other. Kimchi fried rice is usually served with fried egg, nori, chopped scallions, and sesame seeds on top. For this kimchi cheese rice balls recipe, the delicious kimchi fried rice is elevated with the addition of melty cheese and the golden brown crunchy outer coating.
Is kimchi fried rice common in Korea?
Yes, kimchi fried rice is a commonly served dish in Korea. They call it “kimchi bokkeum bap” in which bokkeum means fried and bap means rice. It is well-loved for being simple and very easy to make, yet super tasty. Plus, it’s a great way to use up kimchi and leftover rice.
What kind of rice is best for kimchi cheese rice balls?
I like to use short or medium-grain rice because it is starchier and stickier than long-grain rice. Since the rice balls need to hold their shape, the rice needs to be somewhat sticky. Ideally, you’d want to use cold day-old rice to make the fried rice because fresh rice has the tendency to clump up when cooked. Day-old rice is also drier, which allows the flavors of the ingredients to absorb better.
How spicy are kimchi cheese rice balls?
These kimchi rice balls are not super spicy – they’re just right. Feel free to adjust the spice level to your preference. If you want, you can add gochugaru or chopped chili peppers to the fried rice.
Looking for more easy and delicious fried rice recipes
Spam Fried Rice — Spam fried rice is an easy hearty recipe made with everyday staple ingredients. It’s a very simple recipe using pantry items like rice, Spam, potatoes, egg, and aromatics. This dish comes together in just 20 minutes and will surely satisfy your hunger at any time.
Pineapple Fried Rice — This savory fried rice recipe features juicy succulent shrimp with sweet golden pineapple, beautifully served on a pineapple peel. It’s an easy recipe that’s great when you’re craving restaurant-quality pineapple fried rice without the price tag.
Chinese Shrimp Fried Rice — This Chinese shrimp fried rice has a delightful combination of succulent shrimp, lightly seasoned rice, a medley of vegetables, and signature Chinese flavors. It’s guaranteed to hit the spot every time! Best of all, everything comes together in just 30 minutes!
Lap Cheong Fried Rice — This fried rice showcases the flavors of lap cheong or Chinese sausage, a classic ingredient in Chinese cuisine. It’s meaty and slightly sweet and salty, complemented by savory soy sauce and oyster sauce.
Chinese Garlic Fried Rice — A recipe made for garlic lovers! The fried rice is also seasoned with chicken bouillon and Shaoxing wine for that signature Chinese restaurant quality taste.

Kimchi Cheese Rice Balls Recipe
Ingredients
- 2 cups day old cooked rice preferably short-grain or medium-grain
- 1 cup kimchi chopped
- 1 tbsp unsalted butter
- 2 tbsp kimchi juice
- 1 tbsp soy sauce
- 1 tsp gochujang
- 1 tsp sesame oil
- 2 tbsp grated Parmesan cheese adjust to taste
- 1/4 cup mozzarella cheese shredded
- neutral oil for frying
Fry Coating
- 1/2 cup all-purpose flour
- 2 eggs
- 1 cup panko breadcrumbs
- 1 tsp salt divided, adjust to taste
Kimchi Mayo Sauce
- 1/4 cup Kewpie mayo
- 1 tbsp kimchi juice
- 1 garlic clove grated
Garnish
- kimchi mayo
- scallions chopped
- black sesame seeds
Instructions
- In a pan, melt unsalted butter over medium heat. Toss in the kimchi and saute for 1 to 2 minutes. Add rice and break it up using a spatula then mix well.
- Season the rice with kimchi juice, soy sauce, gochujang, and sesame oil. Add the parmesan cheese and stir to mix well.
- Stir fry for another 1 to 2 minutes. Transfer the rice to a bowl and set aside to cool completely.
- Once the rice has cooled to the touch, grab about 2 tablespoons of fried rice onto your hand. Flatten it out into a disk then place 1 tablespoon of shredded mozzarella cheese in the center. Cover with another 2 tablespoons of fried rice then form into a ball. Make sure to squeeze the fried rice balls with the palms of both hands so they stick together.*You can make the balls in advance and store them in the fridge until ready to fry.
- Next, prepare your fry coating stations. In a shallow plate or bowl, mix together all-purpose flour and 1/2 teaspoon salt. In a separate shallow plate or bowl, crack the eggs and whisk until homogenous. In another shallow plate or bowl, mix together panko breadcrumbs and 1/2 tsp salt.
- Coat the kimchi rice ball in the flour then into the egg, making sure all sides are evenly coated. Transfer it to the panko breadcrumbs and gently press the breadcrumbs into the kimchi rice ball so it adheres better.
- In a deep pot or pan, fill it up halfway with neutral oil. Heat to 375F or 190C. Carefully place the rice balls into the hot oil. I recommend working in batches to prevent the pot from overcrowding. Fry for 3 minutes or until golden brown and crispy.
- Transfer to a wire rack to cool. Serve with Kimchi Mayo Sauce and garnishes. Enjoy!
Kimchi Mayo Sauce
- In a small mixing bowl, combine Kewpie mayo, kimchi juice, and grated garlic. Stir to mix well. Store in the fridge for up to 1 week.